Layouts
Intro
As discussed in the Views lesson, a Layout is a subclass of View. Layouts are what we use to organize the different GUI elements on the screen. We have several options in terms of the type of layout we can use. Importantly, Layouts can be nested (and almost always are), so that the user interface of a given Activity actually contains multiple layouts. The two main layouts that we'll discuss today, and which are used most often, are Linear and Relative Layouts.
LinearLayout
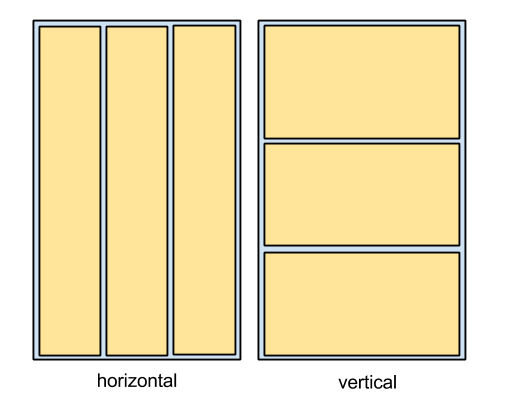
The Linear Layout is used to arrange child Views in columns or rows. An individual Linear Layout can only be designated as either horizontal (children in columns) or vertical (children in rows):
The layout_weight attribute is used to define how much of the parent's unallocated space the child view is able to use. Views with higher weights are given more space. By default, all children have a weight of zero. Without using weights, in order to specify what portion of the screen a View should occupy we would set the layout_height and layout_width attributes to either:
- match_parent,
- wrap_content,
- or a static pixel dimension, e.g. "50dp"
Let's say I want each View to occupy a third of the screen, as depicted in the image above. None of these options accomplishes this for all devices. We need to use weights to achieve this flexibility. For example, to achieve the layout as depicted in the horizontal view above, each child view would need to have the following attributes:
android:layout_width="0dp"
android:layout_height="match_parent"
android:layout_weight="0.33"
Notice that the layout_width attribute has a value of "0dp". This is the indicator that the weight should be applied to the View's width. I like to use fractions of 1 for all my weights, because I think about them in terms of percentage of the screen. In actuality, you can make them whatever you want. As long as all three views have the same weight, they'll be allocated the same amount of space.
To accomplish the vertical layout depicted above, just swap the height and width values:
android:layout_width="match_parent"
android:layout_height="0dp"
android:layout_weight="0.33"
RelativeLayout
The Relative Layout is used to align child Views in relation to either their siblings or their parent View. There are a multitude of options in regards to position attributes. For example, you can specify that the child View should be placed on the left edge of the parent View and below another child View. In order for a View to be referenced, it must have an assigned id value using android:id="@+id/name". The + sign in the attribute signifies assignment. Once a View has been given an id, other Views can refer to it using that id like this: "@id/name" (notice the lack of the + sign).
The below image gives several examples of RelativeLayout layout options. Take a moment and see if you can figure out which attributes you would need to give to the View marked with the "?".
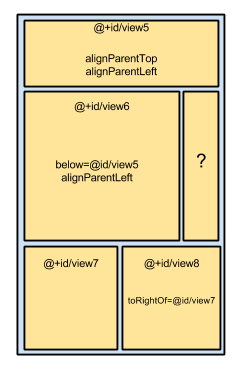
Here's an example of how you might accomplish the above layout:
<?xml version="1.0" encoding="utf-8"?>
<RelativeLayout xmlns:android="http://schemas.android.com/apk/res/android"
    android:layout_width="match_parent"
    android:layout_height="match_parent">

    <View
        android:id="@+id/view5"
        android:layout_width="match_parent"
        android:layout_height="200dp"
        android:layout_alignParentTop="true"
        android:layout_alignParentLeft="true"
        android:background="#0000ff"
    />

    <View
        android:id="@+id/view6"
        android:layout_width="320dp"
        android:layout_height="200dp"
        android:layout_below="@id/view5"
        android:layout_alignParentLeft="true"
        android:background="#ff0000"
        />

    <View
        android:id="@+id/view7"
        android:layout_width="180dp"
        android:layout_height="wrap_content"
        android:layout_below="@id/view6"
        android:layout_alignParentBottom="true"
        android:background="#00ff00"
        />

    <View
        android:id="@+id/view8"
        android:layout_width="wrap_content"
        android:layout_height="wrap_content"
        android:layout_toRightOf="@id/view7"
        android:layout_below="@id/view6"
        android:layout_alignParentBottom="true"
        android:background="#ffff00"
        />

    <View
        android:id="@+id/view9"
        android:layout_width="wrap_content"
        android:layout_height="wrap_content"
        android:layout_toRightOf="@id/view6"
        android:layout_alignParentRight="true"
        android:layout_above="@id/view8"
        android:layout_below="@id/view5"
        android:background="#ffffff"
        />

</RelativeLayout>
Layout and Text Size
When setting the size of GUI items in XML, you do so in terms of pixels. However, you don't use the same syntax you're used to seeing in HTML (px). You have the option of using either dp or sp. We use dp for View sizes and sp for text sizes. dp (or alternately: 'dip') is short for "Density Independent Pixels", and sp stands for "Scale Independent Pixels." Here are a couple example of their use:
android:layout_width="120dp"
android:textSize="20sp"
What's the difference? Here's what Google has to say about it (source):
when specifying dimensions, always use either
dporspunits. Adpis a density-independent pixel that corresponds to the physical size of a pixel at 160 dpi. Anspis the same base unit, but is scaled by the user's preferred text size (it’s a scale-independent pixel), so you should use this measurement unit when defining text size (but never for layout sizes).
Practice
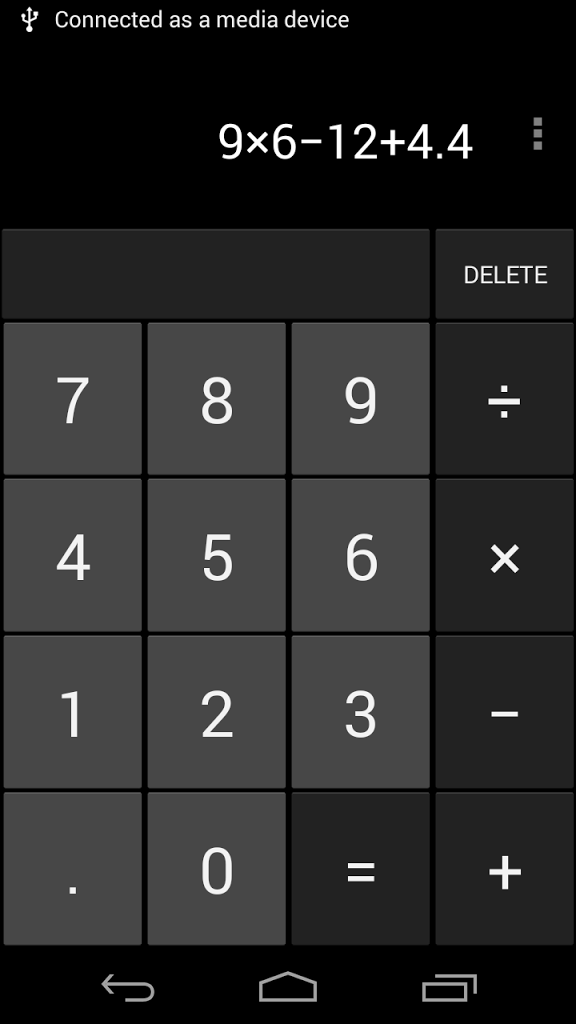
Sometimes the best way to learn something is to just do it...so let's do it! We'll use a LinearLayout to create the user interface of the default calculator in the Android 4.4 (aka KitKat), which looks like this:
Knowing that we're going to use a Linear Layout, take a moment to draw out how we would accomplish the above using nested Linear Layouts:
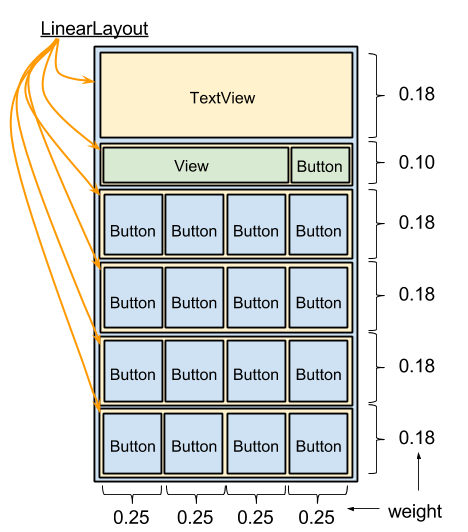
As you can see, we have a main LinearLayout, which contains a TextView and 5 LinearLayouts. The parent Layout is of vertical orientation, and the nested layouts are oriented horizontally. Let's go ahead and create this layout:
- Start a new Android Studio project titled KitKatCalc
- Navigate to the default layout file and change RelativeLayout to LinearLayout
- Add the proper orientation attribute to the LinearLayout. Since we'll have several rows of View, we'll make the main LinearLayout vertical:
android:orientation="vertical"
- Inside of this layout, add the Views as depicted in the graphic above.
- Here are a list of attributes you'll need to successfully accomplish the look we're going for. Click on each attribute to view their respective descriptions and possible values:
In addition to honing your XML skills, building layouts is a good exercise in patience. It takes time to get the desired appearance, and the work can be menial in nature at times. But nothing beats that feeling when you finally get it right and things fall into place :-) Your perseverance will pay off...don't quit!
Check Yourself
The point is to actually learn how to do this, right? So don't cheat yourself. Take the time to figure it out on your own. When you think you're finished...and ONLY when you're finished, feel free to check out my sample solution: